

Due to popular request, I am reposting my consolidated 12V/TCAM Battery Disconnect Process so it can be pinned. In addition to my own photos, I am reposting photos previously shared by by @Artem92115. Photos by @Poleatl are available here. Please follow these steps at your own risk. I am in no way an expert nor do I guarantee any results. Be careful.
12V/TCAM BATTERY DISCONNECT PROCESS
Tools:
Final Steps:
12V/TCAM BATTERY DISCONNECT PROCESS
Tools:
- 7mm and 11mm socket wrenches
- Long flat implement (scissors or screwdriver) to release TCAM battery
- Flashlight (preferably head-mounted although I had to use my phone)
- Small piece of cardboard
- Very small flat head screwdriver
- Ensure car is not plugged into a power source and car is in a well-lit area
- Unlock doors, open rear hatch, and frunk
- Fold down rear seats and remove trunk/boot cover to leave an open working space.
- Move all keys away from vehicle.
- In frunk, find the large plastic panel that spans the width of the vehicle and is closest to the windshield (windscreen). The panel has two black plastic fasteners on each side keeping it in place.
- Insert an implement in the middle of each fastener to release it and then pull out fastener.
- Store plastic fasteners
- Standing on the driver side (may be different for right-hand drive vehicles) pry off the large plastic panel. Note, it is not necessary to remove the entire panel; only the side where the 12V battery is
- Keep the panel out of the way while you work. I just stuck my head under the panel.
- Locate the 12V battery's negative terminal. It has two nuts/bolts to keep it attached. See attached image for reference.
- The nut/bolt facing the front of the vehicle and at an angle is the one you want to loosen. Using an 11mm socket wrench, loosen the negative terminal.
- Once the terminal is loosened, lift the entire piece and it should easily slide off.
- Take the small piece of cardboard (I used a glove) and place it between the piece you removed and the negative terminal so it remains disconnected while you work. Again, see attached image.
- Confirm a successful disconnect by ensuring no lights are on in the vehicle, including the charging light in the exterior charging port.
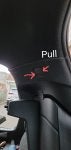
- In the rear side pillar behind rear driver door (again, may be different for right-hand drive vehicles), locate the Volvo airbag plastic symbol (it's a rounded rectangle) and pry off.
- Using a 7mm socket wrench, unscrew the bolt that is revealed underneath the plastic piece you removed.
- Pry off entire panel that should now be loose.
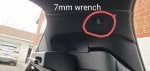
- Once panel is removed, locate horizontal oval hole in the sheet metal (see attached picture)
- Use your flashlight to shine inside the hold and locate the plastic clip you will need to release.
- Take a long flat implement (I used a scissors) and push the plastic clip toward the front of the vehicle to release the TCAM battery.
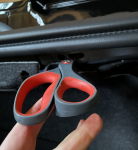
- Now that the TCAM batter has been released, it should hang freely. Take a look at the TCAM battery to understand what you are working with. Again, the flashlight will be necessary to see what's going on. You will likely need to pull the fabric/felt side panel away and down a bit to get good access.
- This part is tricky so take it slowly - on the end of the TCAM battery where the wire connection is, there is a small release. It is a flat tab within a small plastic square next to the wires.
- Using a very small flat head screwdriver, insert it into the small square and push the tab TOWARD the wires to release.
- Remove the flat head screwdriver and you should now be able to release the TCAM batter connection.
Final Steps:
- Wait a few minutes to allow everything to reset. Some suggest 10 or more minutes, but I only let it go a couple minutes.
- Reconnect all connections, panels, fasteners, etc. I recommend reversing the above steps sequentially (i.e., reconnect TCAM battery, replace panels in trunk/boot, reconnect 12V battery, replace frunk panel, etc.)
- Get your key and turn on vehicle. It will go through standard system checks.
- If your LTE is still off at this point, consider a screen reset for safe measure, and make sure your data is turned on.


")


